Transparent Multi-hop SSH
It is often necessary to SSH through one host to get to another host. This article will walk you through configuring SSH so that the intermediate step is transparent.
Example Network
For our example, we're going to use the network pictured below:
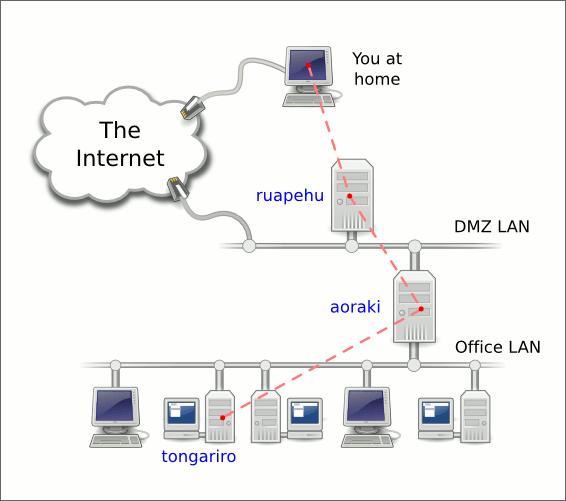
From your computer at home you wish to log in to the host called 'tongariro' on the LAN at your office. All connections into the office LAN must pass through the firewall host 'aoraki'. The firewall host will only accept connections from the bastion host 'ruapehu'.
Doing It Manually
These are the steps we plan to automate:
To connect to 'tongariro' you must first ssh to 'ruapehu'. Because you're connecting over the internet, you'll need to specify the full domain name when you connect. You'll also want to use '-A' to enable 'agent forwarding' (discussed below):
ssh -A ruapehu.example.com
Now that you're logged in to a shell prompt on 'ruapehu', you'll need to connect to 'aoraki'. To allow password-less logins you'll have installed the public key from your home computer into the ~/.ssh/authorized_keys of each host along the way. When you execute the following command, the SSH server on 'aoraki' will request a key, this request will be forwarded back through 'ruapehu' to the agent running on your home computer and access will be granted:
ssh -A aoraki
Finally, you can connect to the target host 'tongariro':
ssh -A tongariro
Quick and Dirty Automation
The manual steps outlined above use three chained SSH connections to pass through two intermediate hosts. You can chain the three commands together into one monster command-line (perhaps in a shell script or a shell alias):
ssh -A -t ruapehu.example.com ssh -A -t aoraki ssh -A tongariro
In addition to the -A to enable agent forwarding, I've added -t to force a pseudo-tty to be allocated. Normally when your ssh command specifies a command to be run on the target host, no pseudo-tty will be allocated. That's fine if you want the command to run and then exit, but if you want an interactive shell session then you'll need a pseudo-tty.
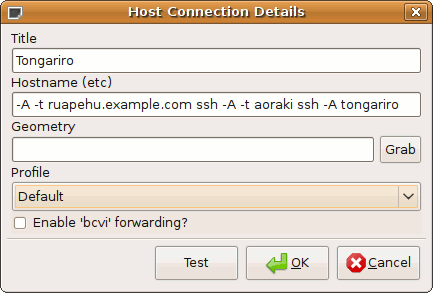
Quick and Dirty Automation with SSHMenu
You could assign that same monster command-line to a host connection on your SSHMenu:
A Better Way
Another way to automate the connections through the intermediate hosts is to add a 'ProxyCommand' setting to your SSH config file. For this to work, you must have the 'netcat' package installed on the intermediate hosts.
Start by editing your SSH config file (which might not exist yet):
gedit ~/.ssh/config
And add the following lines:
Host ruapehu
  HostName ruapehu.example.com

Host aoraki
  ProxyCommand ssh -q ruapehu nc -q0 aoraki 22

Host tongariro
  ProxyCommand ssh -q aoraki nc -q0 %h 22
The first entry defines a hostname alias so that you can ssh to 'ruapehu' instead of having to type 'ruapehu.example.com'.
The second entry sets up a proxy command that will be used to connect to the 'aoraki' host. Normally ssh establishes its own TCP connection to port 22 on the target host, but with this setting in place it will use the proxy command to establish the connection. The proxy command in the example will establish a normal SSH connection to the intermediate host ('ruapehu') and then use the 'nc' command to extend the connection to port 22 on 'aoraki'.
Now that the proxy command is set up, you can connect to the 'aoraki' host simply by typing:
ssh aoraki
The third entry builds on this by using the newly accessible 'aoraki' host in a proxy command which extends the connection to our ultimate target 'tongariro'. Note that in this command, '%h' was used for the hostname. This is simply a shorthand that tells SSH to insert the target hostname (from the line above) in place of the %h. If you want to connect to other hosts on the office LAN you can duplicate the last two lines and just change the hostname in one place.
So Why is this Better?
With the above configuration in place, you can now SSH directly to the 'tongariro' host with this command:
ssh tongariro
You can copy files directly to (or from) 'tongariro' without having to worry about intermediate steps:
scp path/to/local/file tongariro:path/to/remote/file
You can enable X-forwarding which means that any GUI program you start on 'tongariro' will display on your workstation:
ssh -X tongariro xclock
GUI application performance will be sluggish over slow network connections but some GUI apps on your local machine will now be able to use SSH to talk to the remote host. For example if you're running GNOME, you can use an 'ssh' URL in Nautilus to browse files on the remote host. (KDE provides equivalent functionality):

If you right click a file and select "Open with Text Editor", the GNOME Text Editor program will run on your local machine but will use SSH to read/write the file to the remote host.
For an even more powerful approach to editing files over an SSH connection, you might like to look into bcvi.
Many other familiar tools will also be able to use the transparent SSH connections. For example you can access version control repositories (CVS, Subversion, Git etc) over SSH. You can also use port-forwarding on the SSH conection to access intranet servers or HTTP proxies on the office LAN from your workstation.
Reusing Connections
The transparent multi-hop connections can be very useful but you may find that it takes a second or two to establish each connection. This delay can become annoying if it happens a lot (e.g.: every time you save a file from the text editor).
The good news is that if you can configure SSH to reuse an existing connection. This means that for example if you have an SSH shell session running then a new connection for SCP can skip the connection setup phase. Two steps are required:
First, you must create a directory (or 'folder') which SSH will use to keep track of established connections:
mkdir ~/.ssh/tmp
Next, add these two lines at the start of your ~/.ssh/config (make sure to use your username in place of 'YOUR-NAME'):
ControlMaster auto
ControlPath   /home/YOUR-NAME/.ssh/tmp/%h_%p_%r
As you can see, a small investment in time setting up your SSH configuration can pay back dividends in convenience.