Using SSH keys for Password-less Logins
Most people start using SSH by logging in with a password, but re-entering your password for every SSH connection quickly becomes tedious. A better way is to set up a public/private key pair - you unlock your key once and then reuse it to make connections without entering your password. It may sound a bit complicated but you can set it up with two simple commands*
ssh-keygen
ssh-copy-id hostname
You run the first command once to set up your public/private key pair and then you run the second command once for each host you want to connect to.
These steps are spelled out in more detail below, but those two commands are all you need to get going.
* This guide assumes you're running GNOME on a modern desktop Linux distribution such as Ubuntu, Debian, Fedora etc. The SSH agent is typically integrated into the standard GNOME session startup scripts.
Step 0: Think of a password
Before we start with step 1, you'll need to think of a password. That might sound like a contradiction - I promised you password-less logins but then the first thing I want you to do is to think of a new password. You need to protect your private key with a password (actually it's called a 'passphrase' but it means the same thing). You'll enter the passphrase to unlock the private key but you would usually only do this once a day. After that you'll be able to use the unlocked key to perform password-less logins.
The passphrase protects you because if someone manages to obtain a copy of your private key, they won't be able to use it unless they also know your passphrase.
It's always difficult to think up a new password. Especially one that's easy for you to remember, but hard for someone else to guess. Take a moment to think of one now. Don't worry, if you want to change the passphrase later you can do that without having to repeat the whole key setup process.
Step 1: Generate a key pair
Open a terminal window on your computer (not an SSH connection to a server), then type in this command:
ssh-keygen
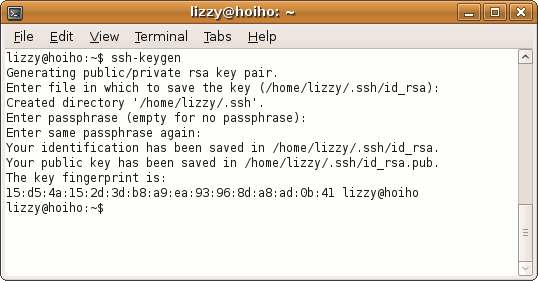
You'll be prompted for a filename - just press Enter. Then you'll need to enter your passphrase a couple of times:

The ssh-keygen program generated two files:
- /home/your-login/.ssh/id_rsa
- /home/your-login/.ssh/id_rsa.pub
The first file is your private key. It only ever needs to exist on your workstation.
The second file is your public key. You'll copy the contents of this file over to each server you want to log into and append it to /home/your-login/.ssh/authorized_keys.
If you get asked whether you want to overwite an existing id_rsa file, it means you already have a public/private key pair. If you don't know the passphrase for that private key then it's completely useless so you might as well overwrite it. If you do know the passphrase then don't overwrite the file, just skip to the next step.
Depending on the version of SSH installed on your machine and how it was set up, your keys may be DSA rather than RSA keys. Either type works just as well as the other. From a user's perspective the only difference is the name of the file.
Step 2: Copy your public key to a server
If you want to install your public key in the authorized_keys file of a server called www.example.com then you'd type this command:
ssh-copy-id www.example.com
You'll be prompted to enter your normal login password on the server and then your public key will be installed. It's as easy as that.
Repeat this step for each server you want to connect to.
It's all set up, now log in
The setup is complete. Now all you have to do is start up an SSH connection to the server in the normal way - either using SSHMenu or the ssh command from a shell prompt. The first time you make a connection to a server where your public key is installed, you'll be prompted to enter the passphrase for your private key. The SSH 'agent' integrated into your GNOME desktop will then keep your private key unlocked for the remainder of your GNOME session.
For your own security, you should configure your screensaver to lock the screen and require password entry before unlocking the desktop. Also if your stepping away from the computer you should press the hot-key to activate the screensaver (Ctrl-Alt-L by default). Without these safeguards, someone with access to your desktop will also have password-less access to any server where you've installed your public key.
If you have a phone with bluetooth, you might want to try installing a tool like blueproximity. This allows your computer to detect when you have walked away and then automatically lock the screen for you.
SSHMenu provides an option on the main menu to 'remove your key from the agent' - which simply means that next time you open an SSH connection you'll be prompted to enter your passphrase again.
Changing your passphrase
Sooner or later you'll want to change the passphrase on your private key. This is the command you should use:
ssh-keygen -p
Be sure to include the '-p' on the end - if you left it off, a new key pair would be generated and saved over the top of your existing key pair (although you would be asked before anything was overwritten). The public key you had installed on all the servers would then be useless.
When you run the correct command, you'll be asked for the filename of your private key - the default is OK, just press Enter. Then you'll need to enter your current passphrase once and your new passphrase twice.
Changing the passphrase on your private key does not affect your public key at all. You'll be able to continue connecting to the hosts where your public key is installed.